Most traders load a signal indicator and enter the moment it lights up. On a 1-minute chart with a short-dated option, that single habit is what quietly drains the account. The A+ Scalp Dashboard was built to cure it. Before we touch a cloud, a gate, or a state, this first lesson installs the one belief the entire A+ series runs on: a false "yes" costs an options scalper far more than a missed trade — so the goal is never to catch every move, it's to make sure that when the tools say yes, yes means something.
That asymmetry is the whole reason the series exists. If you trade shares, a wrong entry and a skipped entry are roughly symmetric annoyances. If you hold a 0DTE or 1DTE option, they are nothing alike.
The two errors are not the same size
Every signal you take is one of four outcomes: a good trade you took, a good trade you skipped, a bad trade you skipped, and a bad trade you took. The last one — the false PASS — is the expensive one on an option, because theta decay starts working against you the instant you're filled. A skipped good trade costs you only opportunity, and there's another setup in a few minutes. Drag the expiry and compare the two errors directly:
This is why the A+ series optimizes for precision over recall — it would rather block a trade that would have worked than let one false yes through. A signal service sells you recall ("we caught the move!"). A scalping cockpit that respects your premium sells you precision. If you internalize nothing else from this course, internalize that trade-off: on a decaying option, being selective is the edge, and being early is the leak.
Meet the four members
The A+ series is a family of four Pine indicators. You'll spend most of this course on the first one; the others exist to support it and — importantly — to keep it honest.
| A+ Scalp Dashboard — the main tool | A+ Chop Filter — the counterweight | |
|---|---|---|
| Role | The cockpit | The skeptic |
| Answers | "Do I take this entry?" | "Is this flip worth taking?" |
| Where | Overlay on price | Separate pane |
| Teaches | gates, clouds, state machine | grading + self-measurement |
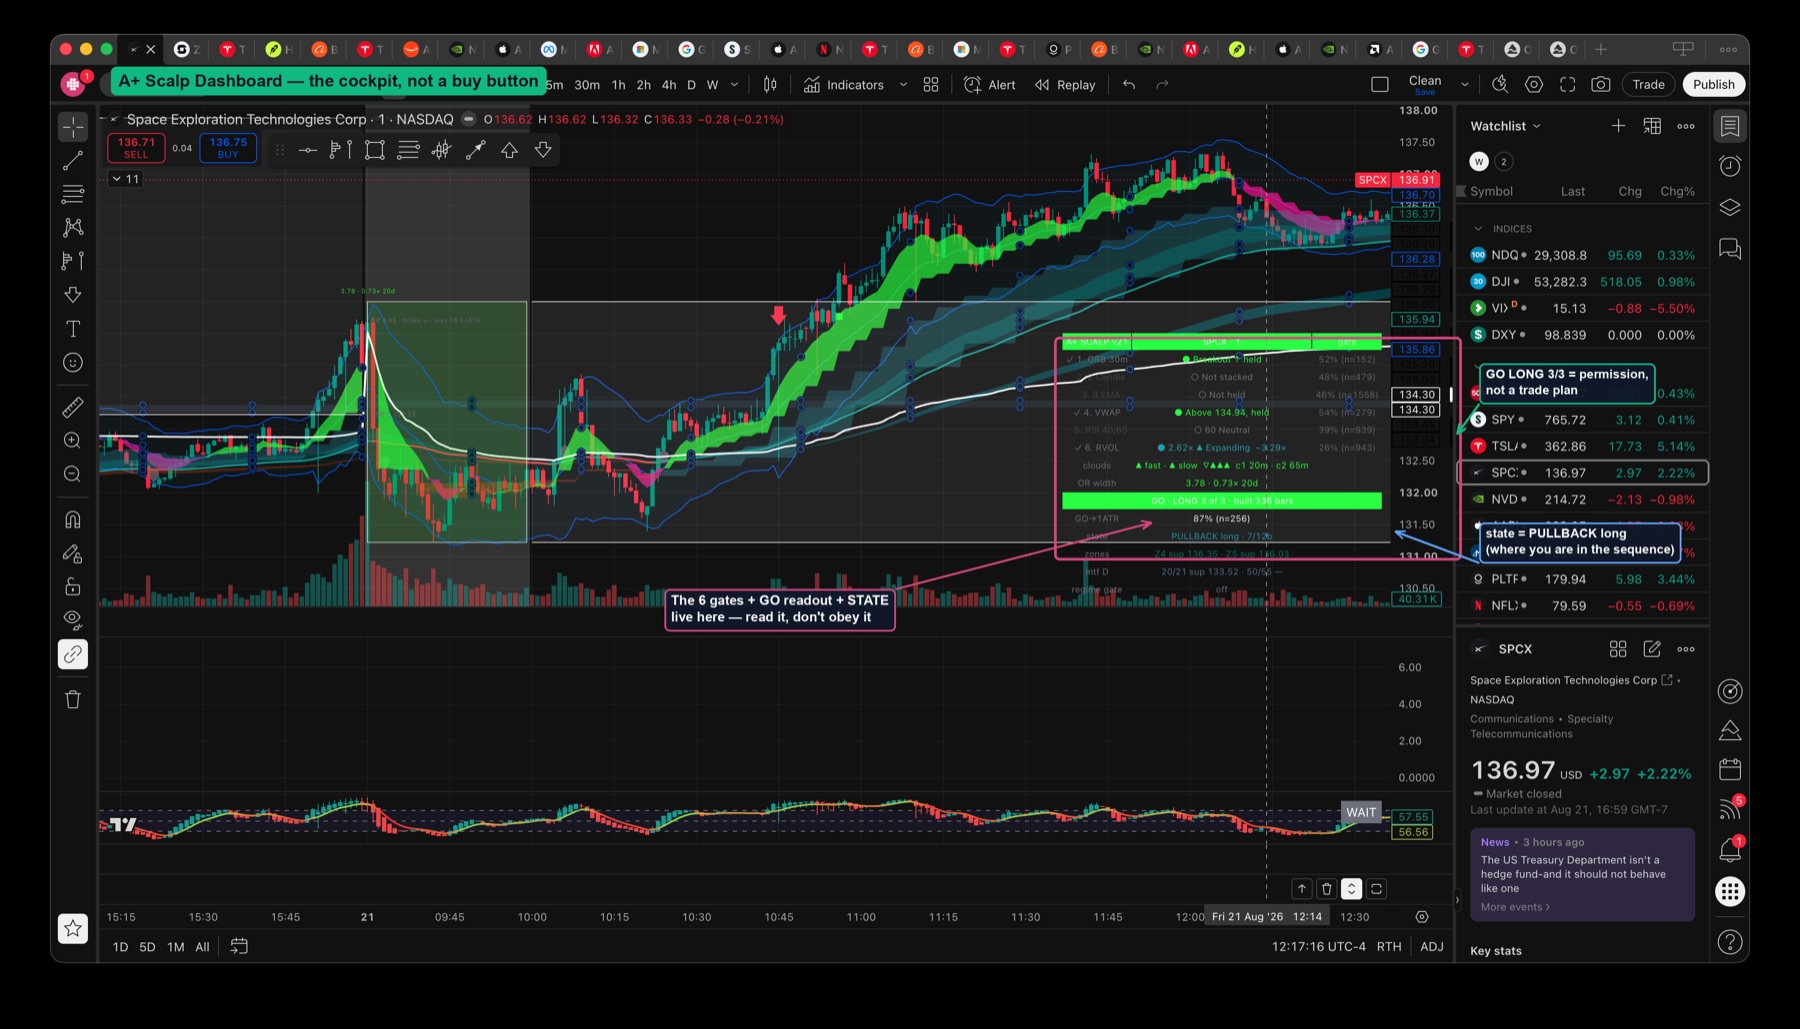
- A+ Scalp Dashboard (the overlay you'll see all course long) is the cockpit: momentum clouds, six gates, an entry state machine, and a GO readout. It tells you which side is even eligible and how sure it is.
- A+ Chop Filter is the designed counterweight — one member is allowed to be confident, the other exists to falsify it. It grades every cloud flip and, remarkably, scores its own verdicts with a real stop.
- A+ Structure and A+ Open are context members. Both label themselves UNPROVEN on purpose, because their signal claims did not survive honest testing. We'll use them as a lesson in intellectual honesty, not as signals.
Here's the main tool on a live chart — the A+ Scalp Dashboard on SPCX. Notice it's a dense readout, not a single arrow:
The honest promise of this course
The most valuable thing the A+ docs establish is where the edge isn't. Traded blindly, the raw cloud flip has no measured edge — its expectancy is statistically indistinguishable from zero. That is not a flaw we're hiding; it's the entire point. The reliability doesn't live in the flip. It lives in what you demand after the flip: the right side, a real structure shift, a confirmed state, a non-blocking chop verdict, and a real stop.
So this is a reading-and-discipline course, not a signal service. By the end you'll be able to look at the dashboard and know the difference between what a real trading edge is and a pretty label — and you'll read the ± before you trust any number the tool prints.
Related reading
Build the mindset this course rests on with these Oyamori Learning articles:
- 0DTE Scalping: Which Tickers Actually Work — why short-DTE demands precision
- Options Theta Decay Strategy — the clock that punishes a false PASS
- What Is a Trading Edge? — the difference between an edge and a signal
- How to Find Your Trading Edge — where real edges actually come from
- Fear in Trading — why traders chase the flip in the first place
Next up: Lesson 2 — the Oyamori Momentum Clouds, the engine underneath every A+ signal.