This is the lesson the whole course exists for. If you take one habit away from A+ Options Scalping, make it this: the cloud flip is the alert, not the entry. Traded blindly, the raw fast-cloud flip has no measured edge — its expectancy is statistically indistinguishable from zero. The reliability isn't in the flip. It's in what you demand after it: the right side, a genuine structure shift or a clean first pullback, an RVOL-backed confirmed state, and only then an entry. This lesson turns that into a repeatable rule.
Entering the instant a signal fires is the single most expensive habit in scalping — the same impatience that gets traders stopped out at support, amplified by options decay.
Why the flip alone fails
Recall from Lesson 2 that a flip is momentum-of-momentum — it leads price. Leading is exactly why it's early, and early is exactly why it's unreliable on its own: at the flip bar, price has only just begun to turn, nothing has confirmed, and half the time it's a wiggle that un-flips two bars later. On a share you shrug; on a short-DTE Call you've already paid theta and delta is against you before the move even decides.
So we treat the flip as what it is — a prompt to start watching — and we build a gate between the alert and the trade.
The state machine: TRIGGER is not CONFIRMED
The dashboard's Lane 7 already encodes this. The entry state machine moves through a sequence, and the crucial distinction is that TRIGGER is not the entry — CONFIRMED is. Walk the full sequence and watch what each state tells you to do:
- TRIGGER — the fast cloud agreed. This is the flip. Most losing scalps are entered right here.
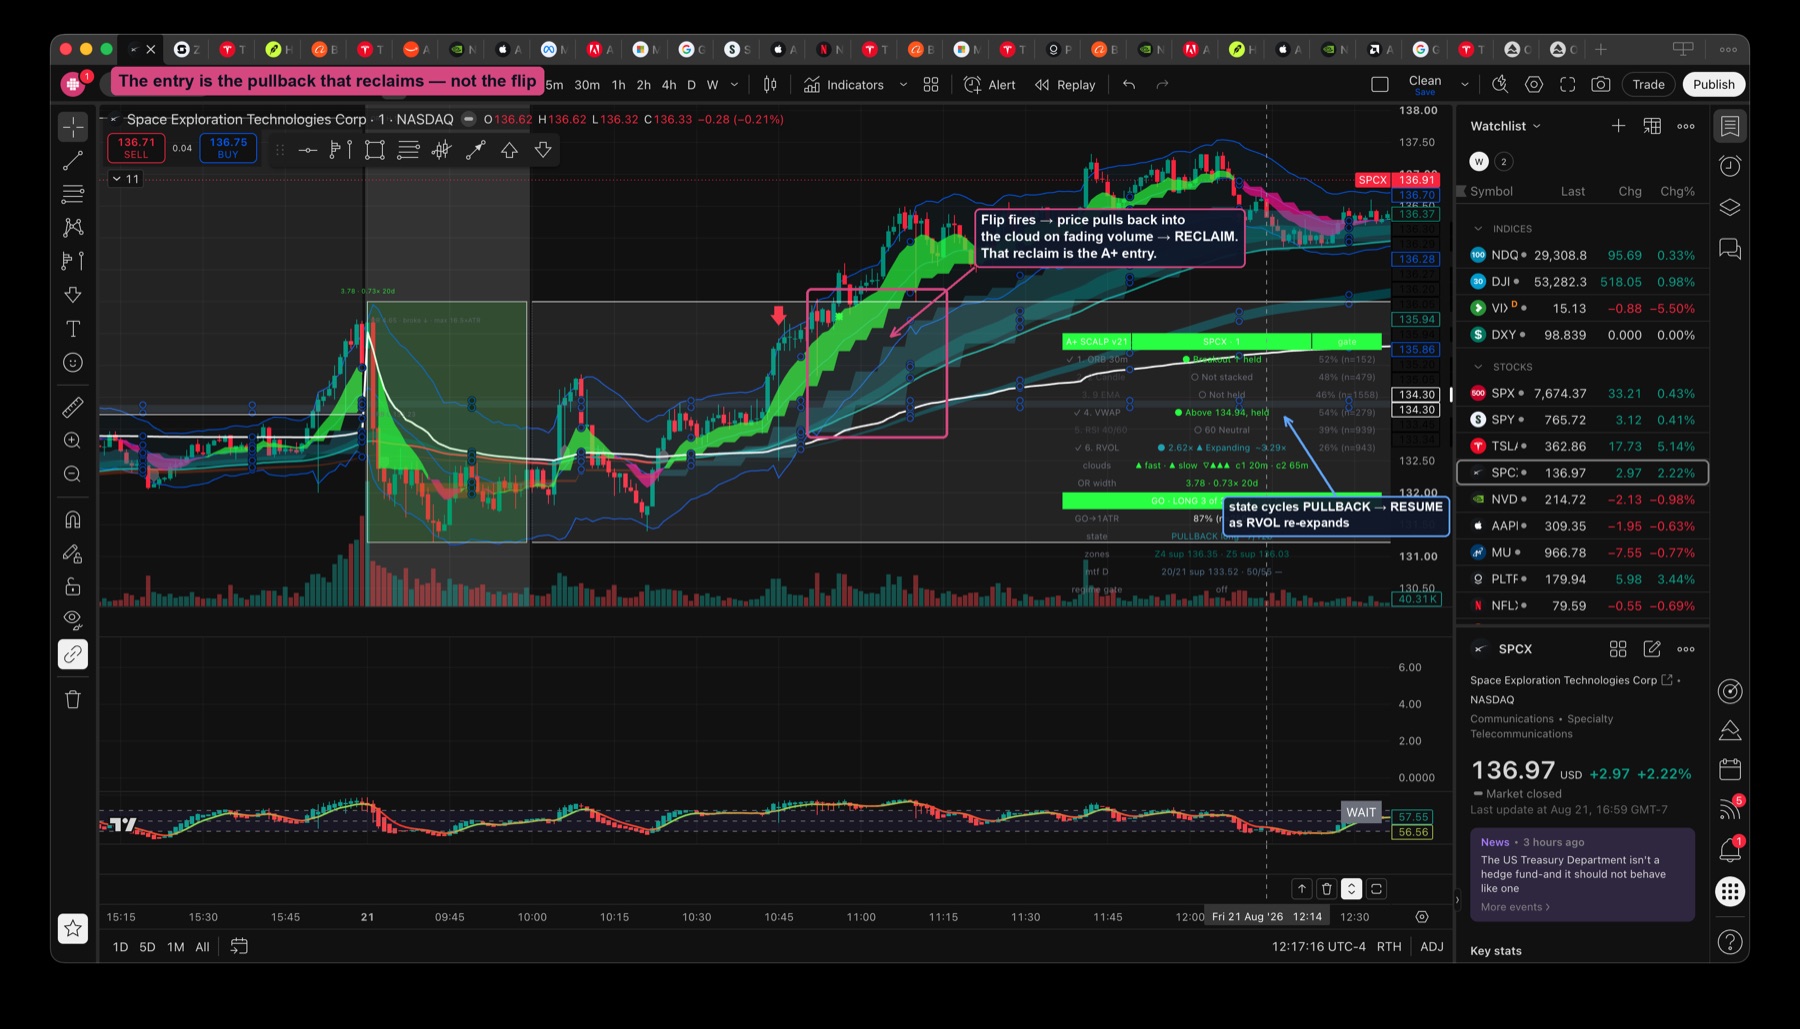
- CONFIRMED — RVOL now backs the turn. This is where the A+ entry lives.
- EXTENDED — already 1×ATR from the trigger; the scored move has happened. Amber: do not chase.
- PULLBACK → RESUME — price retraces on fading volume, then turns back up as RVOL re-expands. The resume is often the highest-quality entry of the whole move.
The single skill here is refusing to act on TRIGGER and waiting for CONFIRMED or RESUME. That's the difference between buying the alert and buying the setup.
Add the structure shift: CHoCH, BOS, first pullback
The state machine handles momentum and volume. The other half of a reliable entry is market structure — and this is where A+ meets everything in our SMC/ICT checklist. After the flip, demand a real structural event before you commit:
- A change of character (CHoCH) — price breaks a swing against the old direction, the first evidence the trend is actually turning, not just wiggling.
- A break of structure (BOS) — price breaks a swing with the new direction, confirming continuation.
- A clean first pullback — after displacement, price pulls back on fading volume and holds, giving you a defined-risk entry instead of chasing.
The best A+ longs pair a bullish flip with a bullish structure shift and a first pullback that reclaims — exactly the sell-side sweep and reclaim you learned to read, now confirmed by the clouds. Here it is on SPCX: the flip fires, price pulls back into the cloud on fading volume, and the reclaim is the entry:
The rule: what you demand after the flip
Put it together into one gate you run every time the cloud flips. It has two must-haves — a structure shift or clean pullback, and an RVOL-backed confirmation — because without them you're trading the alert:
The full reliable sequence, start to finish:
This is the precise edge of A+ Scalp: not "the cloud flipped, buy," but "the cloud flipped, so I start watching — and I enter only when structure, volume, and the chop filter all agree, with my risk defined." It's slower, it skips trades, and it's exactly why it's more reliable than chasing every flip. The next lesson introduces the fourth check in that chain — the A+ Chop Filter.
Related reading
- When to Enter a Long — the structure-confirmation entry, step by step
- The Long Lower Wick: a Sell-Side Sweep — reading the pullback that reclaims
- Why Price Pulls Back — the mechanics of the first pullback
- SMC/ICT Checklist — CHoCH, BOS, and the full validation gate
- Multi-Timeframe Entry — anchoring the flip to the higher timeframe
- Inducement in SMC — the trap that punishes entering too early
Next: Lesson 7 — the A+ Chop Filter, the skeptic that grades every flip.