You cannot define a breakout without a level, and the level is usually drawn wrong. This lesson settles the wick-versus-body argument, replaces the single line with four, and shows why the asymmetry between them is the difference between a small early loss and a large late one.
Why one line is the wrong model
Draw a range with a single resistance line and you immediately face questions it cannot answer. Does a wick through it count? What about a close two cents above that reverses? Was that a breakout that failed, or never a breakout at all?
The questions are unanswerable because the model is wrong. Price does not interact with a pixel. It interacts with an area where orders are concentrated — and that area has two meaningfully different edges.
R_outer  =  the extreme of the range        (highest high, wicks included)
R_inner  =  the body / close cluster        (where most bars actually topped)

S_inner  =  the body / close cluster below
S_outer  =  the extreme                     (lowest low, wicks included)
Between R_inner and R_outer sits the upper boundary zone. It is not no-man's-land. It is where liquidity gets taken, where sweeps happen, where the market probes to see what is there. Price spending time in that zone during a healthy consolidation means nothing at all.
The wick question, settled
Keep the wicks. They are where the resting orders actually sat — the price a breakout genuinely has to overcome. Dropping them produces "breakouts" that never cleared anything real.
But classify with the close. The wick defines the level; the body decides what just happened.
| What you see | What it is |
|---|---|
| Wick pierces the zone, closes back inside | A liquidity sweep — the level held and someone's stops paid for it |
| A close beyond the outer level | A breakout attempt |
| Two consecutive closes back inside the inner level | Failure |
That single distinction — wicks for the level, closes for the verdict — resolves nearly every "was that a breakout?" argument.
The asymmetry that matters
Each of the four levels has exactly one job:
| Level | Job |
|---|---|
R_outer |
Trigger — a close above it is the breakout trigger |
R_inner |
Invalidation — a close back below it kills the long thesis |
S_inner |
Invalidation for the short side |
S_outer |
Trigger for the short side |
You trigger on the outer level and you invalidate on the inner level. The trigger is harder to reach than the invalidation is to violate — and that is exactly right.
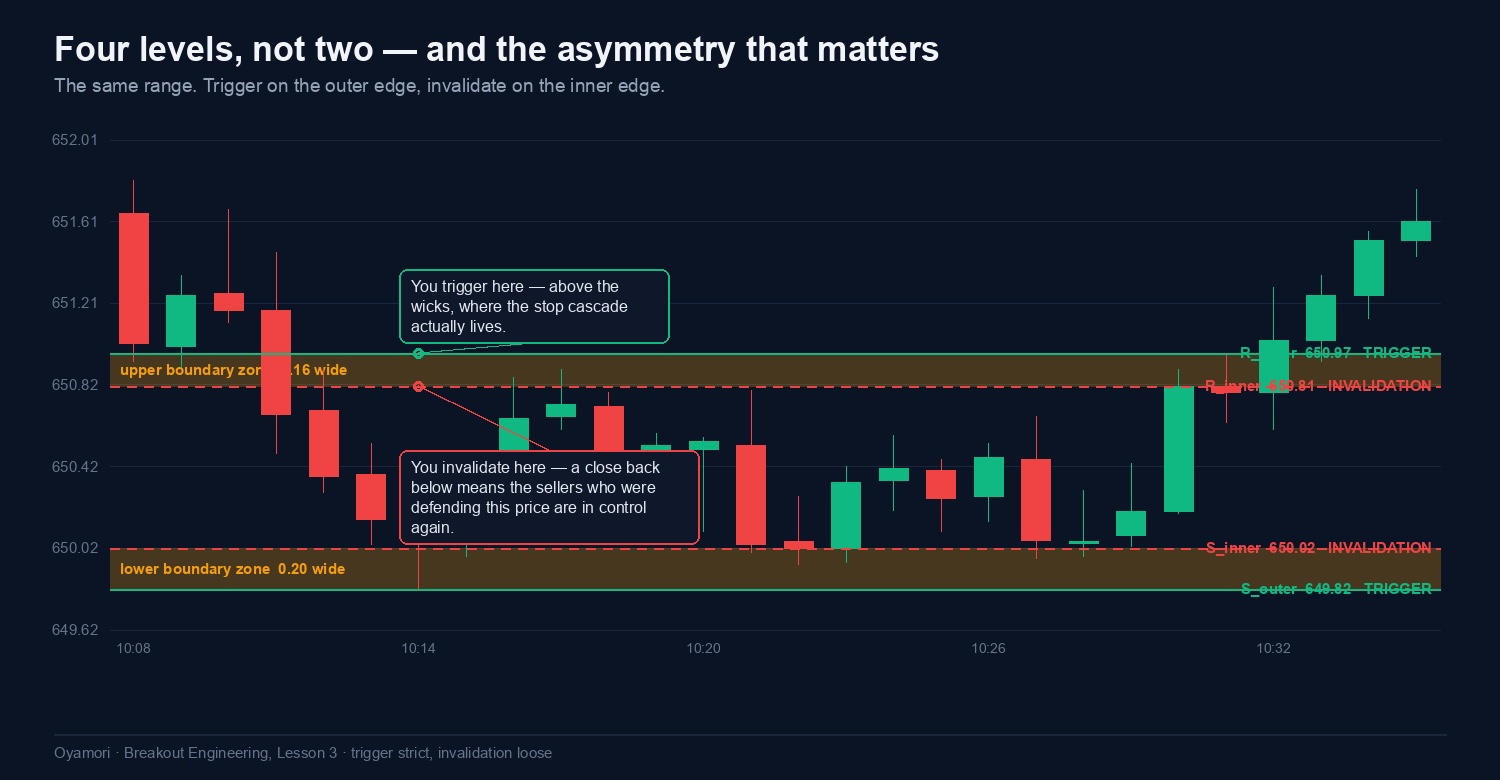
Think about who is positioned where. A short filled inside the range has a stop somewhere above R_outer, because anything tighter would already have been hit during normal rotation. The stop cascade lives above the outer level, not the inner one. Trigger on R_inner and you have entered before the fuel is even reachable.
Now the other direction. Once price is genuinely outside and expanding, what says the move has failed is not price returning to the range low — it is price returning to where sellers were comfortable, which is R_inner. Waiting for the range low to admit that is waiting for a large loss to confirm what a small one already told you.
Build the four levels from your own range:
The width of the zone is itself a signal
The gap between the cluster and the extreme tells you how much to trust the trigger.
A wide zone means a single spike has pulled the outer level away from where anyone is actually trading. Either redraw the range or demand considerably more from every other condition before taking the break.
How many boundary tests should I want before trading a break?
Three or more is the usual guide, and there is a reason for it beyond pattern-matching. Each test consumes some of the resting orders defending the level — the fourth test faces thinner defence than the first. But there is a limit: a level tested seven or eight times without breaking is often telling you that real size is parked there, not that it is about to give way. Somewhere between three and six tests is where the level has been proven relevant without being proven impenetrable. And note this is a heuristic from order-flow reasoning, not something we have measured on a large sample — treat it as a prior, not a rule.
What you should take from this lesson
- Four levels, not two — outer extremes and inner body clusters, on both sides.
- Wicks define the level, closes decide the verdict. Keep both, use each for its own job.
- Trigger outer, invalidate inner. Entry strict, exit loose — because the fuel is outside and the sellers are inside.
- Check the zone width. Wide zones mean an unreliable trigger, whatever else the chart looks like.
The four borders that price reverses at covers the same zone-not-line idea from the reversal side — worth reading alongside this.
Next: what actually happens in the order book when the boundary breaks — and why the first ninety seconds look the same in both outcomes.