You have a level, a trigger price and a thesis. What is left is when the position goes on. Three answers are in common use, and they differ in one variable: how much the market has told you by the time your money is at risk. At the moment the boundary clears you have the best price and almost no evidence. Ten minutes later you know whether the market accepted the level, and you are paying for that knowledge in the entry.
Across 490 SPY sessions and 489 first breakout attempts out of compressed ranges, 09:45–14:30 ET, 75% of breaks failed under our working definition of two consecutive closes back inside the range. When three quarters of entries are wrong, when you commit stops being a preference.
Model A: earliest entry, best price, worst information
Model B: latest entry, worst price, best information
Model C: commitment spread across the sequence, size follows proof
Model A — enter on the trigger
Take the position on the tick that clears the outer level, or on the close of the bar that clears it. Full initial size. Harvest fast.
Model A is the only model that participates in the impulse, the segment where a real break and a fake break look identical. That is its argument. On our sample the breaks that failed still reached a median best price of 0.19W at five minutes, against 0.43W for those that held (W is the width of the range that broke; median W on SPY is 1.00 point, about 0.15% of price). The failures are worth less, not nothing, and no other model is there to collect it.
What you give up is filtering. You are in every fakeout by design, so Model A looks poor on any win-rate measure and makes sense only once harvesting during the impulse is counted. The book asserts it has negative expectancy without that discipline — the author's logs, not our measurement. It suits a trader with fast hands and a level clean enough to rest an order at.
Model B — break, then retest
Wait for price to return to the old boundary and enter when it is defended from the other side, on the bar that takes out the rejection bar's high, with the stop under the retest low.
What you gain is real. The retest answers a question the break did not: whether standing demand exists at the level, rather than whether one burst of demand cleared it once. The stop is tighter, because the retest low is a price the market has defended, and a tighter stop at the same dollar risk buys more contracts.
What you give up is availability and selection. The book's logs put a normal-band retest on fewer than half of quality breaks — 47% upside, 31% downside — and the breaks that never retest have a median first leg roughly 1.8 times larger. We have not measured either figure, but the direction follows from mechanism: a move strong enough to refuse a pullback is a strong move. A retest-only rule does not thin your trade list at random. It thins it against the largest winners.
A pullback arriving after the move has topped is not a retest either. It is the first leg of the failure, and your trigger fires into it.
Model C — probe, confirm, add
Take a small position at the trigger. Add only as the market answers questions.
trigger fires        → probe, about a third of full size
impulse extends      → harvest part of the probe
acceptance forms     → add
retest holds         → add
                       the stop moves up with every add
The shape inverts Model A's: smallest at the moment of greatest uncertainty, largest at the moment of greatest proof. Given a 75% failure rate, most sequences stop after the probe, and the probe is a third of what Model A would have committed.
The costs are a worse average entry, because the adds happen higher, and difficulty — three entries, three stop moves and several harvests inside about twelve minutes. Its characteristic failure is doing half of it: taking the probe, missing the harvest, adding anyway, holding full size with nothing realised when the break fails.
One rule keeps the ladder honest: an add increases your risk unless the stop moves with it. Adding while leaving the stop where it was doubles exposure to the same invalidation and calls it scaling.
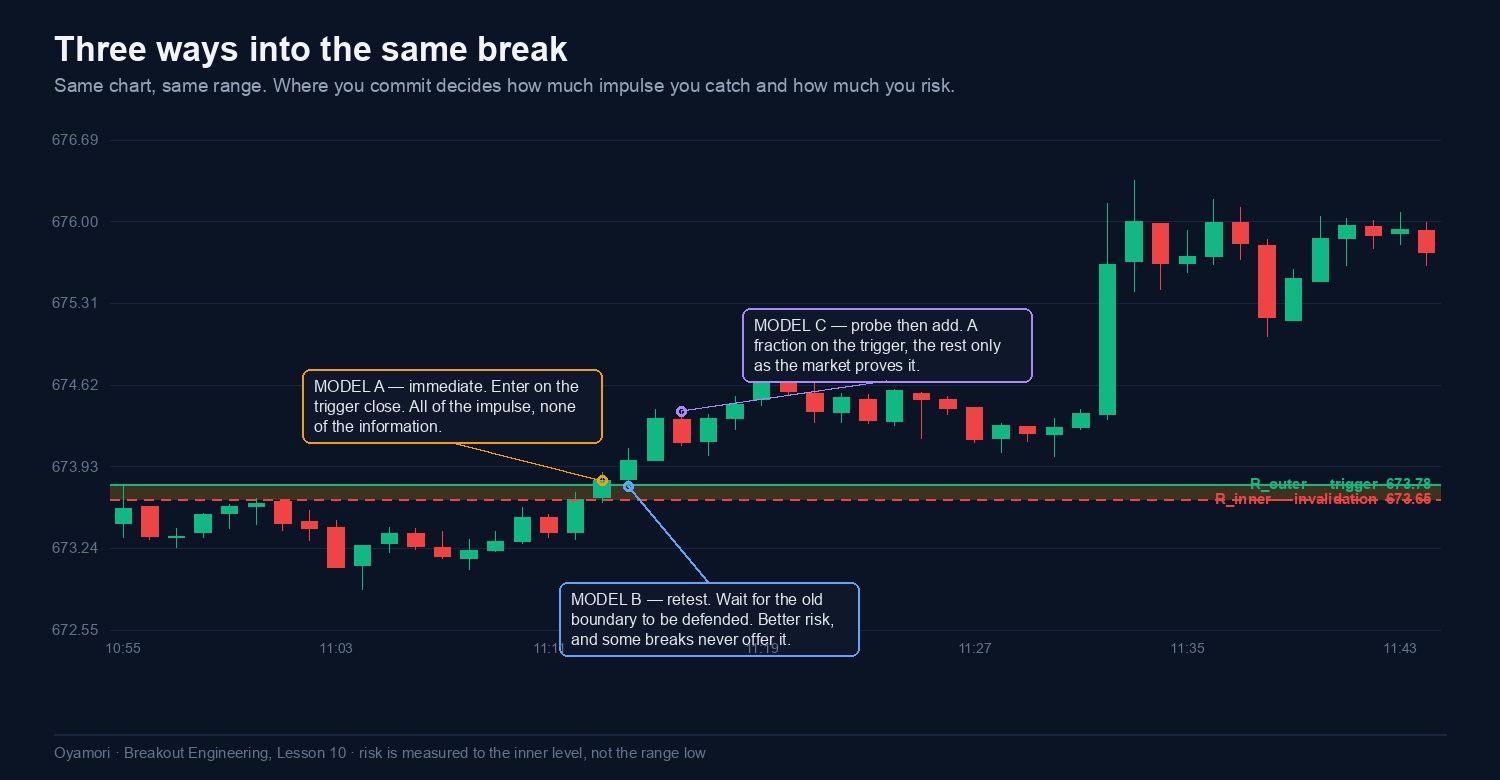
The three side by side
| Model A | Model B | Model C | |
|---|---|---|---|
| Entry price | Best | Worst | Blended |
| Information at entry | Least | Most | Grows with the position |
| Stop distance | Widest | Tightest | Wide, then tightens |
| Availability | Every break | Under half | Fewest, needs room |
| Execution demand | High | Moderate | Highest |
| In the impulse? | Yes | No | Partially |
| Suits | Fast hands, clean level | Imprecise level, slow tape | Aligned setups, a checklist |
What if the model I picked never gets its entry?
Then the trade is over, not adapted. The common failure is selecting Model B, waiting for a retest, watching price run away without one, and taking a late "Model A" entry far above where Model A would have filled. That is a new and worse trade wearing an old trade's name, with a stop distance that corresponds to nothing.
The stop is a sentence, not a number
Most stated stops are budgets in disguise: ten percent of premium, two hundred dollars, half the contract. They carry no information about the market, so they cannot tell you that you were wrong.
Write the thesis first. A market that spent twenty minutes unable to trade above this level has now closed above it, and I expect it to trade further away before it trades back inside. The stop is the price that makes the sentence false.
That gives the placement directly. As covered in the boundary lesson, a range has two edges: the outer level, a single extreme print, and the inner level, where sellers were repeatedly comfortable. Trigger on the outer level, invalidate on the inner one. Dipping under the outer level proves close to nothing, because probing there is normal. A close below the inner level means the defenders have their level back — closes, not touches, because a wick in fast tape is noise while a close is a full bar of two-sided trade inside the old range.
And contract count is the output of the stop distance, not an input to it. If the structural stop does not fit the risk budget, take fewer contracts. A stop shortened to fit a position size no longer marks an invalidation.
Why the stop under the whole range is wrong here
The classical breakout stop sits below the entire consolidation. For a swing trader that is correct: the thesis is about the range as a whole, and its width is noise against the target. For a one-minute scalp on a decaying option it is the wrong tool, for reasons that are arithmetic rather than temperamental.
| Stop at the inner level | Stop under the whole range | |
|---|---|---|
| Distance | the boundary-zone width | the full range, several times larger |
| Contracts at the same risk | several | often one |
| What it means | the thesis is false | nothing you had not already seen |
| Resolves | fast, median 4 minutes | late, after the reclaim |
Same trade, same dollar risk, a several-fold difference in position size, decided by where you placed the point at which you were wrong. One contract also means no harvest ladder, which removes the mechanism Model A depends on.
The timing argument is stronger. On our 489 attempts the median time to a confirmed failure was 4 minutes, a quarter inside 2 and three quarters inside 9. The answer arrives early, and a stop under the range converts that small early answer into a large late one: you sit through the failure, the reclaim and the developing reversal, each an exit in its own right, to lose more at the end.
Costs are excluded from those, and they cover one instrument, one timeframe and a thirty-minute horizon. What they establish is enough: failure is the common outcome, it declares itself quickly, and the distance between entry and stop is the most consequential number in the trade.
One last rule: the stop moves to structure, never to your entry price. A breakeven stop sits almost exactly where a healthy retest lands, so it removes you from correct trades at the reload. Move it below the breakout's structure low, or below the retest low once one holds. Those are prices the market has defended. Your entry is not.
What you should take from this lesson
- The models trade price against information. Model A takes the best price with the least evidence, Model B the best evidence at the worst price, Model C spreads the commitment so size grows with proof.
- Model B is a specialisation, not a default. It is unavailable on more than half of breaks, and by mechanism the ones it misses are the larger ones.
- Select the model before the break. If its entry never materialises, that is no trade, not a substitute at a worse price.
- Trigger on the outer level, invalidate on the inner one, on closes rather than touches, and let the stop distance set the size instead of the reverse.
- A stop under the whole range answers late and large. With 75% of breaks failing and a median 4 minutes to failure, the invalidation stop answers sooner, for a fraction of the loss, on a bigger position.
Next: targets, position management and the problem of expressing all of this in 0DTE options, where theta charges rent for every minute the trade spends deciding.